 |
| Looks like fun, doesn't it? |
Most equestrians dream about going out on long trail rides through meadows and woodlands, or galloping on the beach, or climbing mountains; all without a care in the world. Unfortunately trail riding is far more dangerous than people think. However, if the right steps are taken to prevent incidents, and if the rider is equipped both mentally and physically to deal with anything that does come up, trail riding can be a fun and relaxing way to see the world.
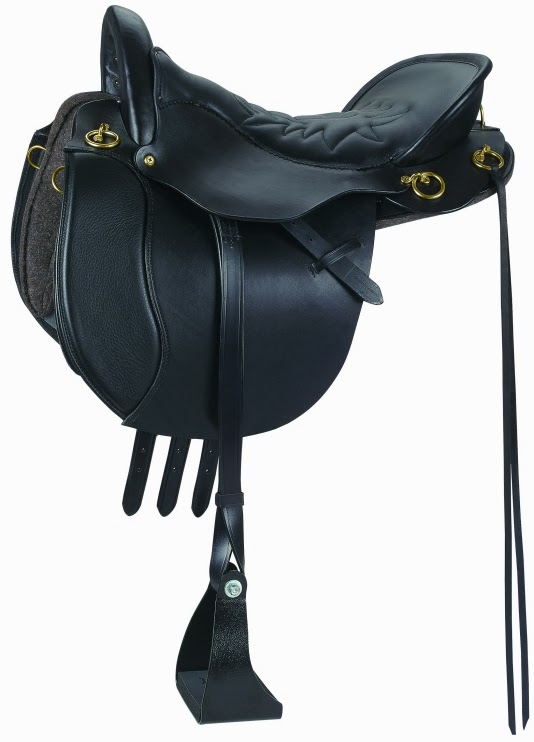
So where should you start? Certainly well before you mount up. The first thing to do is make sure you have good equipment that can handle the trail. If you just plan on hacking out for an hour or two, then the saddle you would usually ride in, provided it fits your horse and you well, should do just fine. If you plan on doing longer rides, or competing in endurance competition however, you might want to invest in an endurance saddle, Australian saddle, or good quality Western trail saddle.
 |
| Australian saddle. Yes they just smashed a Western and an English saddle together, but they're very comfortable. |
 |
| A Western trail saddle. Designed for the comfort of both horse and rider. They can be large and heavy, though. |
 |
| An English endurance saddle. The Western variety is, I think, more common. I would use English because Western stirrup leathers are a mystery to me, but the choice is yours. |
You should dress yourself for the weather when you go out. As long as you have a helmet and boots that fit well, everything else is up to you. Just remember that things can change fast out there, and you should always be prepared.
Ok! You're all tacked up and ready to head out! Except you're not. You've still got a ways to go before you can go galloping through a summer field. Before you can even hack down the driveway, you have to make sure your horse will respond well in the arena. You should be able to ride in control through at least the first three gaits, as well as be able to stop, back and turn your horse with a slight pressure. You also need to be able to control the front and back halves of your horse independently, that is, being able to slide the shoulders or the hindquarters over by themselves. This will be especially helpful if you need to go through a gate and latch it behind you.
 |
| Don't let this happen to you! Sack out your horse the right way. |
is not to get your horse used to one scary thing, but to give your horse a way to cope that keeps everyone safe. You want your horse to think "Oh, this is just Mom/Dad testing me again, if I stand still this weird thing will go away."
http://www.youtube.com/watch?v=FCWeAUD65ek
The link above is another video from my favorite inappropriate horseman. Don't watch if there's a little one around, but he makes great points. If you want to get right to it, skip to 3:08. The only thing you will miss is how he constructed the bag contraption, and why he cut the bottoms off the bags (more control, less wild flapping in the wind). It's all about sacking out a horse the right way so they will develop that coping mechanism and stand still when they're frightened instead of bolting or bucking.
Also, make absolutely sure that your horse is accustomed to cars, trucks, motorcycles and bicycles before you hit the trail. Chances are you will have to walk on the road to reach a trailhead, and having a horse spook at a car on pavement can be disastrous. Use the pressure and release method at the end of your driveway until your horse is accustomed to whatever vehicles might come down the road. If you live on a quiet road you might want to have a friend help by driving their car by a few times. Repeat this for several days until your horse doesn't react to the cars.
The next step in getting ready to hack out is repeating everything you've done so far in several safe locations outside the ring. Ride all around the farm, practicing your stops, turns, backs etc. as well as sacking out. Remember to always exercise good common sense and safety while around your horse.
If you've done all this and you feel comfortable, then you can start to hack out. Start off slow and simple, just walking down the road or on the trails near your farm, and as you and your horse feel more comfortable, you can start going out longer and farther. You might want to take your horse out in hand for the first few times, just to see how he/she might react. Also consider going out with a friend who has a lot of trail experience, and who's horse won't spook at much.
 |
| Hard to miss this! |
If you're riding in an area with heavy traffic, or going out near sunrise or sunset, you should consider reflective gear for you and your horse. They make vest and armbands for people, as well as blankets, boots and saddlepads for your horse. There is also reflective tape that can be stuck to just about anything.
If you are going to trailer your horse to trail ride, make sure he/she is accustomed to the trailer to avoid injury, and arriving at the trailhead with a nervous horse. Check out Trailer Troubles for my take on how to properly accustom your horse to a trailer. Happy trails!

